|
Teaching An Old Dog
New Tricks - Part I The Charge The Verdict Get out of the Rut
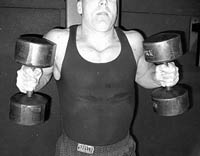
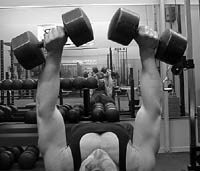
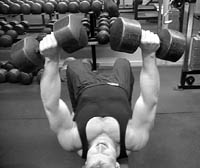
Movement One: The Flat Dumbbell Press I know what you're thinking, "Arik, what in the hell are you going to teach me about a dumbbell press that I haven't already heard a million times before?" Indeed, this is one of the most basic, old school exercises in the book. So why is it then, I can still walk into nearly any gym and find 9 out of 10 people still not doing this movement correctly, or at least not taking it to it's full potential benefit. Perhaps you are already utilizing some of the techniques I'm going to describe in the latter part of this article. Maybe, you aren't using any of them. Nonetheless, after we break this movement into it's individual parts you'll be dumbbell pressing like an old veteran.
Step Four
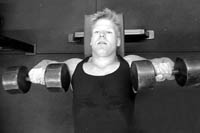
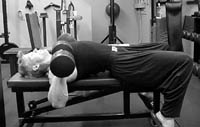
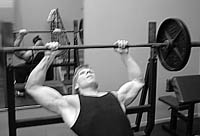
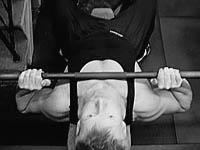
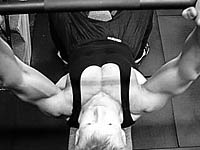
This is bar none one of the best movements you can do to develop the clavicular portion of the pectorals. Paying attention to the details involved on this one will make or break whether you'll end up with an impressive upper chest or just tired shoulders. Traditional incline benching is not the ideal movement for upper chest development because of the large degree of anterior delt involvement, especially if the elbows are at a greater than 90 degree angle (which is never desirable). Bodybuilding mags of yesteryear always preached a wide grip for a wide chest. If we take a closer look at the kinesiology of this movement, it becomes increasingly apparent that the individual who developed this theory had a few too many hits from the bong. Benching with the wrists placed outside the perimeter of the elbows will do nothing but place increased stress on the shoulders. On that note. Step One
Forcing Adaptation Means Learning to Use the Muscle Effectively More often than we realize, peripheral muscles will become involved in an exercise to a greater degree than is desirable in that particular movement. The body's natural solutions for compensating for muscle weakness and are rather efficient and can sometimes cheat us out of the results we expect to achieve from a certain exercise. We must 1) recognize these muscle imbalances and take the proper steps to correct them and 2) develop the proper coordination through practice to trick the body out of doing what it naturally wants to do at times. The exercises described in Part I of this article are a perfect example of this. The body does not want to naturally retract the scapulae throughout the entire ROM during these movements, which is why beginners almost always overexert the shoulders at the top of most chest exercises. It takes conscious thought and repetitive application to develop the skills necessary to maintain ideal body positioning at all times. It's also common to see beginners applying intensity at the expense of technique. After all, one must "lift heavy to get big", right? Not so fast. Proper technique is critical if the increased level of intensity is going to do it's job. This is mostly due to the phenomenon we discussed, known as "load sharing". In laymen's terms this simply means if you are handling to much weight for the targeted muscle(s) to handle, the body will swiftly divert more of the load onto other muscles that may not necessarily be the muscles you are prioritizing. We will discuss this more and take an in-depth look at how it relates to many different exercises in future issues of Shapeshifter. Arik Orosz is the owner of Shapeshifter, an athletic training facility located in Minneapolis Minnesota. To schedule a private consultation, call 612-328-5712 or send your email to arik@shapeshiftermagazine.com |
 We all done it and I don't
believe any of us are exempt from this particular scenario. We humans
are creatures of habit and like to act accordingly. Life gets busy,
and suddenly we find ourselves not alotting the amount of time we
used to spend thinking about how to train intelligently. We begin
to give ourselves a pat on the back just for the fact we got our
foot through the front door of the gym today. Then before we realize
what even hit us, we're waking up one cloudy morning only to realize
that our progress has become stagnant and our current routine is
about as exciting as quantum theory is to an exotic dancer. It's
time to pull out of autopilot in the gym and begin to think things
through a little more carefully again. The intended purpose of this
article is to 1) add some new weapons to your training arsenal and
2) transform some of the more primitive, basic movements into more
highly evolved, and thus more effective movements. Now, as Judge
Mills Lane always states so eloquently- Let's get it on!
We all done it and I don't
believe any of us are exempt from this particular scenario. We humans
are creatures of habit and like to act accordingly. Life gets busy,
and suddenly we find ourselves not alotting the amount of time we
used to spend thinking about how to train intelligently. We begin
to give ourselves a pat on the back just for the fact we got our
foot through the front door of the gym today. Then before we realize
what even hit us, we're waking up one cloudy morning only to realize
that our progress has become stagnant and our current routine is
about as exciting as quantum theory is to an exotic dancer. It's
time to pull out of autopilot in the gym and begin to think things
through a little more carefully again. The intended purpose of this
article is to 1) add some new weapons to your training arsenal and
2) transform some of the more primitive, basic movements into more
highly evolved, and thus more effective movements. Now, as Judge
Mills Lane always states so eloquently- Let's get it on!