|
Teaching An Old Dog New Tricks - Part Tre
Armed and Dangerous
by Arik Orosz
The purpose of this column is to make ordinary exercises extraordinary.
How do you make something extraordinary? You tweak it from every
possible angle until it is nothing short of perfect. Get out of
the mindset of just going through the motions. Leave that mentality
for the ordinary folk. Every time you set foot in the gym or on
the field, do it with a purpose! Live life with this mindset and
you cannot help but to be a success story. Others will wonder what
you possess that they wish they could have. Your example will inspire
those around you and most importantly you will be a person who gets
results. If there is one thing I've learned from my years in the
business, it's that nothing speaks like results. You can talk all
the smack in the world, but if you can't deliver then you might
as well not even bother opening your mouth. With that being said,
lets tweak some arm movements into a new level of perfection.
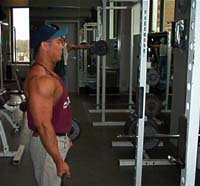
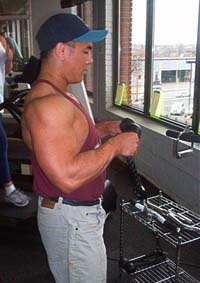
Exercise #1 Straight Bar Curl (biceps-mid range)
This is officially the most basic biceps movement in existence,
yet you still see at least half of the trainees (and some trainers)
doing it wrong. It is simple but to achieve the most from this movement,
some basic mechanics such as wrist, elbow, shoulder, and even torso
positioning must be examined.
|
Step One
Start with the body perfectly upright, the traps slightly flexed and the arms fully extended. Despite all the articles you've read telling you to pull the elbows back as far as possible, this is incorrect. Doing this will limit the range of effective work. Ideally, the upper arm should be parallel to the torso with the shoulder blades and traps lightly pulled back. For advanced trainees shifting the elbow slightly forward without cheating will give an even stronger high-range contraction.
|
|
|
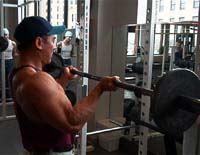
Step Two
Raise the bar to a full contraction without moving the shoulder position or using the low back. An example of this would be the guy in the gym who is befuddled by his lack of progress, yet proceeds to do a crossbreed deadlift/curl every time he trains arms. Don't be this guy! As you approach the top of the movement, (slightly) letting the wrist back will displace any undesired forearm activity into the biceps. Whatever you do, please don't be the guy who curls his wrist inward the whole time in his unspoken quest for 12" biceps and 15" forearms!
|
|
|
Step Three
Lower the weight slowly back to the starting position.
|
|
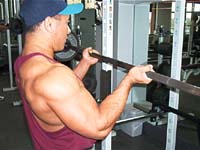
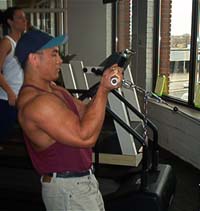
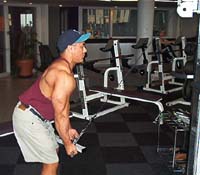
Exercise #2 - High Cable Curl (biceps-high range)
|
Step One
Start by adjusting the pulley to waist-level. The arms will be fully extended and should draw a straight line from the shoulder to the pulley. Lean the body back about 10 degrees.
|
|
|
Step Two
Curl the weight up with out letting the upper arms change position and slightly let the wrist back toward the top. It is critical not to let the elbows drift back during the curl. This will turn the curl into a weird variation of a cable row. This curl also places emphasis on the high range of the movement, much like a concentration curl. A change in arm position will detract from this high range emphasis.
|
|
|
Step Three
Slowly lower back to starting position.
|
|
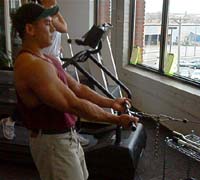
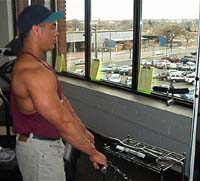
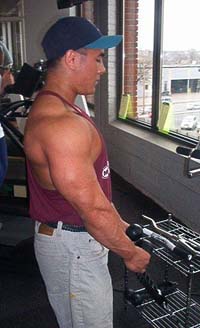
Exercise #3 Cable Reverse Curl
(brachialis and forearm flexors)
|
Step One
Place the pulley in the lowest position possible. Grab the bar with the thumbs underneath and the palms facing the floor. Back away from the pulley about 12"-18".
|
|
Step Two
Keeping the elbows slightly forward of center, curl the weight up until full contraction is achieved. Keep the wrists completely straight on this movement and the thumbs locked down tightly. If a straight bar places too much stress on the wrist you may opt to use an ez-curl bar on this movement.
|
|
|
Step Three
Slowly lower the weight back to starting position.
|
|
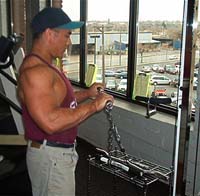
Exercise #4 Rope Hammer Curl (brachialis)
|
Step One
Place the pulley in the lowest position possible. You may need to stand on a small platform (Reebok Step, etc.) to allow full extension of the arms depending on the length of the rope.
|
|
|
Step Two
Keep the elbows firmly planted at the sides,
the palms facing each other, and the elbows back. Curl the
weight up to a full contraction. Toward the top of the contraction
you may slightly shift the elbow forward (1"-2")
and gently let the wrists tilt downward. This will increase
tension achieved in the brachialis with this movement.
|
|
|
Step Three
Slowly lower the rope back to starting position.
|
|
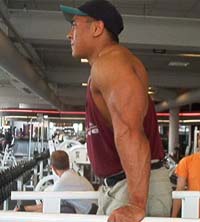
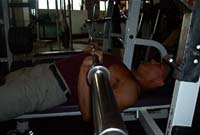
Exercise #5 - Dips (emphasis on triceps)
This is one of the top dog movements for adding size and strength
to your triceps. If you've gotten lazy and neglected these for awhile,
you may want to reconsider making these the cornerstone of your
triceps workout for awhile.
|
Step One
Start with palms no wider than shoulder width on the dip bars. Any wider than this will place too much emphasis on the chest and shoulders. Keep the torso as upright as possible. This will also help to divert the tension into the triceps rather than the chest/delts.
|
|
|
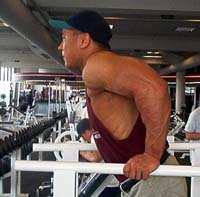
Step Two
Lower the body slowly to a position where the upper arms are parallel or slightly short of parallel to the dip bars. Go too deep and you will burn the front delts out before the triceps are done. As you lower, be sure not to lean too far forward, this will keep the tension in the triceps.
|
|
|
Step Three
Raise back up to starting position with a controlled but
powerful movement.
|
|
|
Step Four
Add weight by using a dip belt or placing a dumbbell between
the legs as needed.
|
|
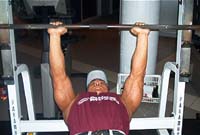
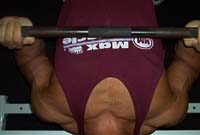
Exercise #6 - Close grip bench press
This is the "other top dog" of all triceps movements. If you can't add muscle to your triceps doing these properly, then you can't add muscle.
Step One
Lay down on a flat bench and position yourself
just like a regular bench press: centered, shoulders pulled
back at all times, feet wide to provide stability for the
torso, low back and abs tight. Slide the head back as far
as it will go without coming off the bench. This will minimize
the bar distance traveled from the rack to the starting position
for this exercise. Grip the bar with the hands 12"-18"
depending on wrist health and shoulder width. If your wrist
stability is nominal you may opt to use a wider grip. Use
a "thumbs under" grip to lend extra support to the
wrist and make sure the other four fingers are clamped down
tightly on the bar.
|
|
|
Step Two
Lower the bar slowly to the sternum, elbows close to the
torso and keep the load directly above the elbows AT ALL TIMES!
|
|
|
Step Three
Press the weight back up with controlled
power, keeping the shoulders back, the chest out and briefly
pause at the top.
|
|
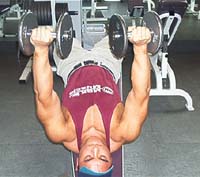
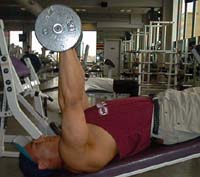
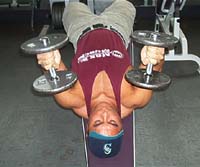
Exercise #7 - Decline Dumbbell Triceps Extension
(pronating at top)
|
Step One
Start on a 30-45 degree decline with the arms extended and
each dumbbell directly above the shoulder. Palms should be
facing toward the knees.
|
|
|
Step Two
Slowly lower the weight to either side of the head while simultaneously turning the palms toward each other.
|
|
|
Step Three
Stop with the dumbbells about 2" away from making contact
with the top of the shoulders and raise back to starting position
by simply reversing the movement.
|


|
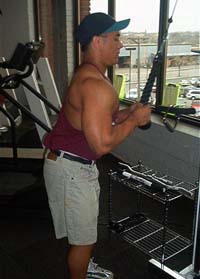
Exercise #8 - Rope triceps Pushdown
|
Step One
This movement is a truly great finisher
when done correctly. It is a fairly complex movement, so take
the time to learn to do it right or it will only be minimally
effective. Start with a slight bend in the knees and slight
sacral tilt. By leaning slightly forward you will displace
the load from the traps and other stabilizers on to the triceps.
This rule applies to every triceps pushdown movement you will
ever do. Grab the rope at the very bottom with the palms facing
each other and the hands about an inch or two from the chest.
The elbows will be facing behind you at the start of the movement.
|
|
|
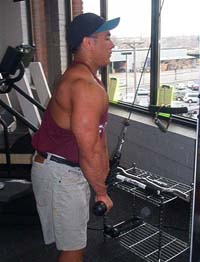
Step Two
Press the weight downward keeping the palms parallel throughout the movement and the shoulders slightly pulled back and down.
|
|
|
Step Three
At the bottom of the movement the palms should still be in front of the chest and not too close to the body. The palms will rotate away from the body (elbows pointed outward) as the rope is pulled into an attempted straightened position. I say "attempted" because the rope will never be completely straightened regardless of how light the weight is. The desired weight on this movement will be approximately 50%-60% of the weight used on regular pushdowns with a straight bar.
|

|
|
Step Four
Reverse movement back into starting position.
|
|
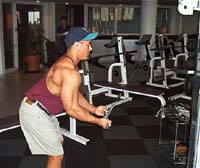
Exercise #9 - triceps Pulldowns
|
Step One
Star with the pulley high. Use a straight bar with a shoulder
width, palms up grip. Move 3 to 4 feet away from the weight
stack and assume an exaggerated version of the pushdown position
described in Exercise 8.
|

|
|
Step Two
Pull the weight down using the triceps. Be sure not to move
the upper arms during this movement.
|
|
|
Step Three
Pause briefly during the contraction at the bottom and control the weight back up to the starting position.
|
|
So there it is. Even those this article merely skims the tip of the iceberg of arm exercises, it will hopefully add a new approach to your technique when training them. Study these movements and perfect them. It will a whole new tightness to your shirt sleeves that you've yet to experience!

TOM NGUYEN
|